PHILIPPE BOLTON
FLUTES A BEC & FLAGEOLETS FAITS A LA MAIN
MAKING A NEW BLOCK FOR A RECORDER
This article was written in 1983. The level of making has considerably progressed since then. There are more good quality hand made recorders around. Craftsmen have gained better knowledge of the acoustics of their instrument, and industrial recorders are much closer in their conception to historic instruments.
However, the information given here might still be of interest to players owning an instrument that is not working as well as it should, or simply to those wanting to learn a little more about the intricacies of recorder voicing.
Recorder voicing is a very precise and intricate job. The aim of this article is to teach a player how to make a new block for his (or her) recorder, if this is the cause of problems. By doing this he can not only improve his instrument but also gain insight into the way it works. The advantage of making a new block is that the original one remains intact, so the instrument can always be restored to its original state. Of course, the fitting of the new block must be done with very great care, as damage to the instrument can be caused by clumsy adjustment. This work applies particularly to industrial or semi-industrial instruments. High quality hand made recorders should always be given to the maker for this kind of adjustment.
The structure of the recorder's mouthpiece or "embouchure"

|
 The chamfers at the windway exit |
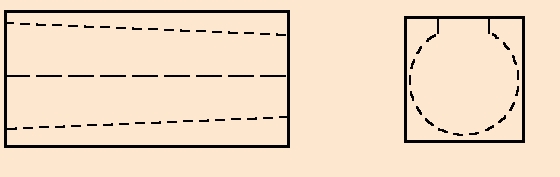
1) The windway: Some recorders have windways with a straight cross section, ![]() whilst others are arched
whilst others are arched ![]() , particularly copies of
early instruments. On original alto recorders the windway entrance is often a little more than
1 mm high and the exit about 0,9 mm. On some modern type recorders the windway is higher. On old
recorders the windway entrance is usually wider than the exit, making it converge and its roof
is usually curved. This is not always the case on modern type
recorders.
, particularly copies of
early instruments. On original alto recorders the windway entrance is often a little more than
1 mm high and the exit about 0,9 mm. On some modern type recorders the windway is higher. On old
recorders the windway entrance is usually wider than the exit, making it converge and its roof
is usually curved. This is not always the case on modern type
recorders.
2) The block. This is in fact the "floor" of the windway so much of what has been said
about the windway also concerns the block. On a baroque type recorder, whose sound is rich in
overtones the block is set fairly high in relation to the labium or edge, so when looking down
through the windway the block adjustment is correct when the edge itself is visible, and just a
little light underneath. However if the edge has been cut fairly high in relation to the bore
less light will be visible, so this might not be a satisfactory test on some recorders. If a lot
of light is visible, then the block could be too low. The top of the block can be horizontal in
relation to the bore axis, but it usually points slightly upwards towards the edge. Its surface
can be straight![]() or, preferably, slightly concave
or, preferably, slightly concave
![]() , but never convex. The body of the block can be
conical or cylindrical. This depends exclusively on the form of the part of the bore in
to which it is inserted. It is in fact easier and less dangerous to fit a conical block than a
cylindrical one, which does carry a danger of splitting the head.
, but never convex. The body of the block can be
conical or cylindrical. This depends exclusively on the form of the part of the bore in
to which it is inserted. It is in fact easier and less dangerous to fit a conical block than a
cylindrical one, which does carry a danger of splitting the head.
3) The labium, lip or edge is the edge towards which the player's breath is directed to form the sound. It is cut out on both sides but only the upper surface is visible when the block is there. The end of the labium is thin and delicate. On old recorders the ramp under the labium, inside the instrument is usually fairly short (about 1 cm for an alto recorder and is level with the bore in the middle. On modern type recorders it is often straight, and is not level with the bore, but higher. The under ramp is also longer.
(4) (5) The chamfers At the windway exit there are usually two small chamfers about 0.5 to 1 mm wide. The top one (4) is on the instrument itself; the lower one (5) is on the block
These facts can vary from one recorder to another. They are just given as guidelines.
The problems that come from the block
Most problems come from the height of the block. It should be set about 1/10 mm below the level of the labium.
- If it is too high the recorder will not speak properly and the sound could be somewhat stifled. This can happen when moisture has caused it to swell.
- If it is too low, the sound can be noisy and the windway will not give any resistance. There are various causes. On some industrial instruments the block is set this way. The labium can also have risen because of moisture, leaving the block too low. The block can also have shrunk is the recorder has remained unused for a long period.
Other anomalies:
- A convex block.
 : the air stream is incorrectly focused. The
instrument speaks badly.
: the air stream is incorrectly focused. The
instrument speaks badly. - Insufficient or badly oriented chamfers. This can give difficult speech and unstable notes.
Some of these problems can be corrected on the original block, but should not be undertaken until sufficient experience is gained to know what one is doing. Making a new block can avoid irreparable mistakes.
Some unstable or difficult notes can also be caused by the instrument's design, so be very careful.
Wood for blocks
Juniper is most commonly used for recorder blocks. It is also called "pencil cedar".
It is both soft and resistant to rot. When wet it gets compressed and shouldn't crack the instrument.
Other resinous timbers like cypress can also be appropriate for this.
Many makers use "Florida cedar" which belongs to the juniper family. It can be bought in square sections from firms specialised in wood for musical instruments.
25 x 25 mm is good for an alto recorder.
Tools for block making
- a vice
- a chisel
- a small model maker's knife
- a saw, preferably a Japanese precision saw (Dozuki or "razor saw")

- one or more scrapers; the one on the right was made from a hacksaw blade.
:

- a flat file
- a "shaping file", "radial file" or "milled tooth file":

If this is not available it can be replaced by some 240 grain abrasive paper placed on a very smooth surface. - a small plane and, possibly, one or more flat soled thumb planes

- a rifler wood rasp, if possible:

- a set square
- callipers
The method recommended for tracing the block on the piece of wood requires a type of callipers that can be used for drawing lines parallel to a flat surface. The Mitutoyo "quadri" model can be used this way, but there are others, which may be cheaper.

Ordinary callipers can also be used for measuring, and there are other methods for drawing on the piece of wood.
- a small ruler
- a sharp pencil
- a small wooden mallet
- Wooden dowel a little narrower than the bore of the recorder's head
- Abrasive paper (240, 320 400 600 grain)
- a sharpening stone, and a burnisher for sharpening the scraper
Access to a grinder could be useful for sharpening new chisels or repairing damaged ones. (Note thatJapanese chisels and knives must not be ground on a dry stone)
Of course this list is not exhaustive.
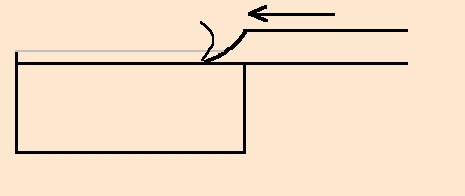
Measuring the existing block
The first thing to do is remove the block. Use a piece of wooden dowel whose diameter is slightly smaller than that of the instrument's bore. Check that its end is smooth so as not to mark the end of the block. Only do this when the instrument is dry, otherwise the block will be difficult to remove, having swollen with moisture, resulting in possible damage. If you do find the block impossible to move, don't continue but give the instrument to a competent repairer.

Put the dowel into the lower end of the bore and tap the block backwards. By putting a finger on the block you should feel it moving. Use the other hand to stop it from flying out violently and being damaged. You can also put a sock around the end of the head to catch it if necessary. If it is difficult to remove you can help by giving light taps to the dowel with a small mallet. If this does not move it at all, then it would be wise not to continue, but have it removed by a competent repairer. Never remove the block when it is swollen with moisture after playing.
Avoid touching the top of the block, to keep it clean. Always hold it by both ends or by its sides as shown here.
")
|
")
|
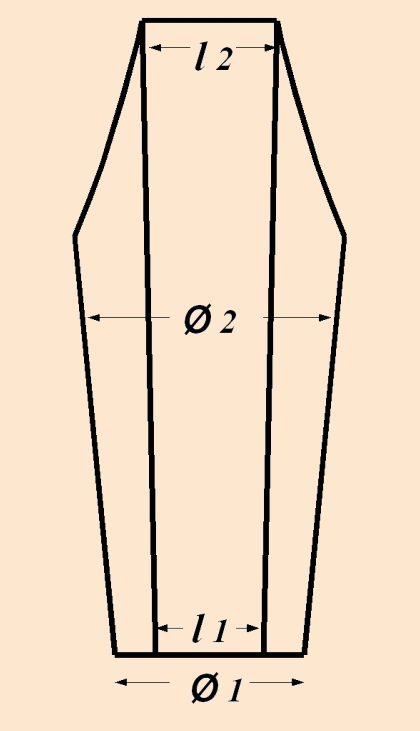
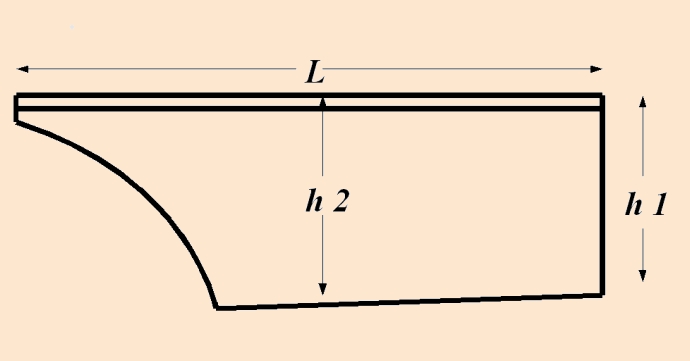
Use the callipers to measure the block.
hese are the measurements you need to take to 1/10th millimetre:
|
|
We must measure h2 and Ø 2 because we cannot measure the height and diameter at the windway entrance. By taking measurements half way down we can estimate those we haven't got by comparison with h1 and Ø 1. We can double the difference between h1 and h2 to find the height, which we will call h3 and between Ø 1 and Ø 2 to find the diameter, which we will call Ø 3. If h1 and h2 are the same, we can assume that h3 = h2 and if Ø 2= Ø 1 we can assume that Ø 3 = Ø 2. h3 and Ø 3 represent the theoretical height and diameter of the block at the windway entrance:
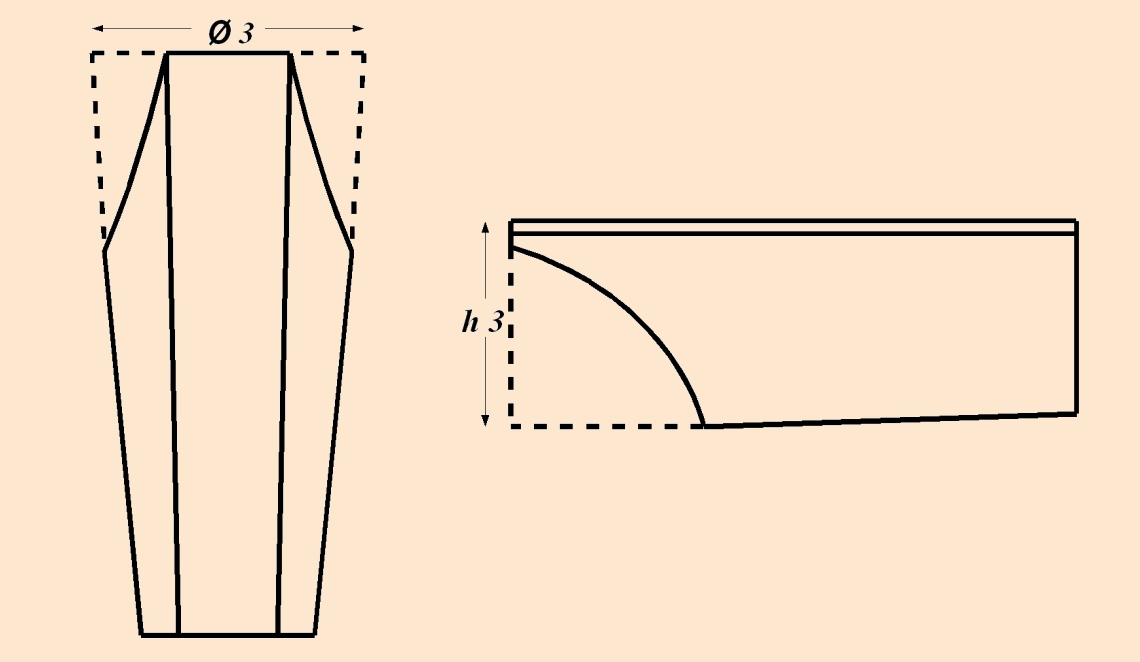
We can now forget h2 and Ø 2. If Ø 1 is equal to Ø 3, we have a cylindrical block
You can now note the measurements in this way:
|
h 1: ........ Ø 1: ........ l 1: ........ length: ........ |
h 3 : ........ Ø 3 : ........ l 2 : ........ |
Of course we cannot change the length or the diameter of the block which are determined by the recorder's own dimensions. We can only work on the height. We can try increasing this by a few tenths of a millimetre. This is of course theoretical. You will have to find the ideal measurements by experimentation. Remember that the block is usually pointing slightly upwards. You can keep this by adding the same value at both ends. It could be wise to make a first block that is much too high, by adding 0.3 or 0.4 mm to h1 and h3. This will give you some margin. We can call these new values nh1 (new height1) and nh3. You can now forget h1 and h3, which belong to the original block. We also need the radius (half the diameter) at each end: r1 and r3
So we will now have the following measurements to work with:
|
nh1: ........ Ø1: ........ r1: ........ l1: ........ longueur: ........ |
nh3 ........: Ø3 : ........ r3: ........ l2 ........ |
This is all the information you require.

|
You can now replace the block if you wish. Insert it carefully into the instrument ensuring that it is exactly in
line with the windway and in the right place. If it came out easily, it will go in again easily.
Just push it in with your thumb, taking care not to break the end. If it resists you will have
to shave a little wood off the sides of the circular part. You can do this by scraping with a
sharp knife held almost vertically against the surface. The places to work on are visible,
since the wood has been compressed by the bore and appears slightly shiny. Take care not to
damage the top of the block, which fits in the windway.
You will now be able to trace the new block on your piece of wood. |
Tracing the new block
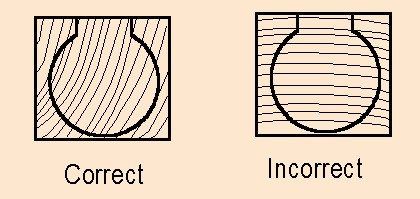
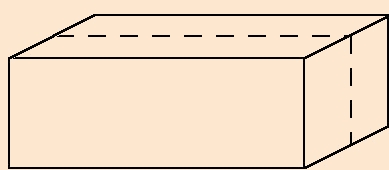
You now need to take square piece of wood whose section is a little bigger and about 1 or 2 mm longer than the finished block section. Be sure to saw is so that its ends are at right angle. One of these will become the end of the block. If necessary plane 2 sides so that they are at right angles to each other. This can be checked with the setsquare. One of these will become the top of the block. Look at the end of the block, and choose for the top the side that puts the growth rings of the wood in as close to the vertical as possible. This will improve moisture absorption.
Looking at the front of the block you can see that there are two different parts carved out of the same piece of wood, the part that fits in the windway and the circular body that supports it. The shoulders mark the separation between the two. There is one on each side.
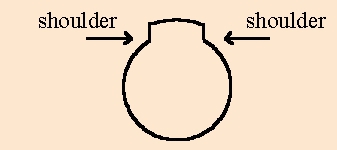
You must now draw this shape on your piece of wood. Because your block can be conical, and the windway wider at one end than the other, it is best to start from the middle.
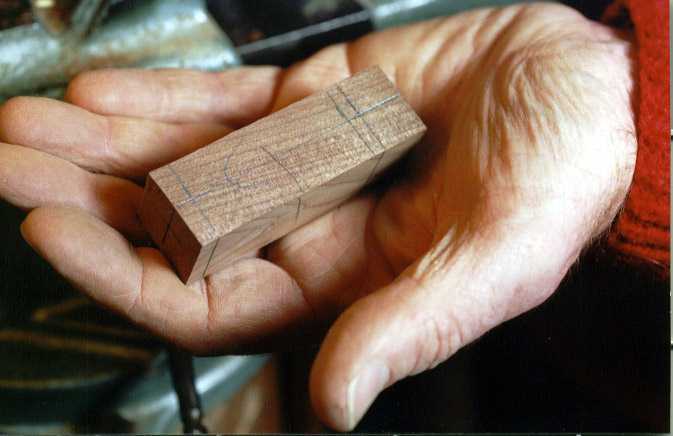
Measure the width of the piece of wood, set the callipers to half this value and use them to draw a line down the middle, on the top and at each end, using a very sharp pencil. Start from the side that has been planed at right angles.

|
|
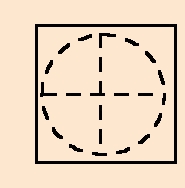
Next find distance of the centre of the circular section from the top by subtracting the height of the block from the radius. (nh3-r3 nh1-r1).
Set your callipers to this value and draw a horizontal line at each end, without forgetting that the two values can be different
 Marking the centre |

Using the callipers as a compass |
The intersection of these two lines marks the centre of the circular part. Now draw a circle using the callipers as a compass placing one of the points of the tool on the centre, using the other to trace the outline. Be careful not to slip, as the wood fibres could drag the points aside. Now accentuate the circle with a pencil to make it more visible. The ends should look like this.
(If you have access to a lathe, you can turn a small cylinder at each end which would be easier to work with than the circle drawn on the wood. Allow a little extra length for this. These cylinders can be cut off later).
You will now have to draw the windway on the upper surface. Starting from the central line, use the callipers as a pair of dividers set to half of l1 and, from this line mark a point at this distance on each side of the line at the exit end. Do the same with 12 at the entrance end. You can join these marks to draw the shape of the windway on the block. Extend these lines down the ends of the block to meet the circles. The shape of the block is now completely visible on the wood.
You are now ready to carve the block.
Forming and fitting the block
For the next operations you must fix the piece of wood in a vice in order to be
able to work freely with both hands. You can put a piece of leather on the jaws to avoid marking
the block if you wish.
You must never use a chisel with one hand while holding the wood
with the other. This is extremely dangerous.
Begin by cutting the shoulders. Either use a small japanese saww to make a cut just outside the lines marking the windway (taking into account the thickness of the blade), or use a knife to make a cut along the windway outline. Then use a chisel flat side down to cut wood away on the outside of the line. If the tool tends to rip instead of cutting you are working against the grain. Turn the wood around and cut in the opposite direction.
Don't try to work too fast. Only remove small shavings. Work as close to the line as possible. As soon as you reach the bottom of the knife cut, make another cut and continue. This cut helps to prevent you from ripping away bits of the windway by accident. As soon as you reach the circles drawn on the ends, stop and do the same on the other side. Your block will now look like this.
You can now start making the "body" of the block.


|
First plane down the sides and the bottom until they are just in line with the circles on
the ends. Be careful not to go too far. If you find yourself working against the grain (the wood
tends to rip) work in the opposite direction.
Next remove all the angles to obtain, little by little, a circular section.
|
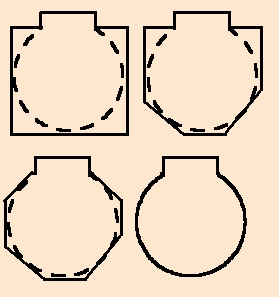
If you are making a small block (soprano size) you can do the whole job with a chisel. For a larger one you might find it more comfortable to start the lower part of the block with a plane. However be careful as the plane works fast and you cannot see the job so well. The shoulders must be cut with the chisel. The plane could damage the windway part.
| You can finish the block with the chisel, a scraper, a small file or by using a knife as a scraper. |

|
The block is now ready to be fitted in the instrument.
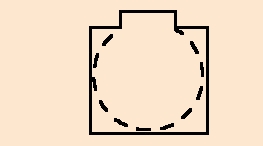
Begin inserting it without any pressure. If it is conical it may go in a little. If it is cylindrical, on the contrary; it may not go in at all. Note the places that hinder, then take it out and start removing wood there. It will then go in a little further. Continue in this way, working very slowly. If you go too quickly you could split the instrument. You can try tapping it in very lightly with a small mallet. This can be safer than pressing hard by hand. Each time it stops the places which rub will become a little shiny through friction against the instrument. This is where you must scrape or file wood away. Check that you are not removing too much wood in other places, or you could leave spaces between the instrument and the block. Be careful, don't progress by more than one or two mm at a time. Conical blocks are less dangerous to insert than cylindrical ones and it is easier to get them airtight.
When the end of the block is in line with the end of the windway you will be ready for the next step. For now the block should be too high, and you should not be able to see the labium edge through the windway.
Note : The author can accept no responsibility for accidents. Be patient and very careful. Don't work too fast.
Voicing instrument with the new block
We have now reached the most important part of the job, getting the recorder to sound with the new block. We have to work on the top of the block, which should still be too high if you have followed the instructions correctly. So there should not be much sound. There may not be any low notes, and the highest ones may only speak with difficulty.
You must progressively take wood off the top until it is just lower than the edge of the labium. At the same time you will also have to adjust its slope, since Watch the following points:
- Height: when the block is in the instrument you should just see a little light under the labium, but no more.
- Slope: it should be pointing slightly upwards. This is easier to judge with a cylindrical block than with a conical one.
- Concavity: the top of the block must be slightly concave lengthways. You can check this by putting a ruler along the surface and looking against the light.
- Curvature: if the labium and windway are arched the block must be the same. Check that you have the same curvature all along.
These tips should enable you to make the instrument sound correctly. However, please bear in mind that you will have to adjust the block to the other parameters of your recorder to get the best results, so a block well suited to one instrument may not work so well on another. You will have to do some experimentation.
The following is a list of different techniques you can use to achieve this aim. Sometimes two of these are recommended for one particular job. Just choose the one that suits you best. Each of these is described once and not necessarily in chronological order. They will probably be used several times before the voicing is finished. Each one has a number so that it can be found easily. They are not necessarily in chronological order, so it is wise to study the whole text before doing any practical work. The measuring techniques are shown at the end.
The different paragraphs are numbered to help find the right technique at the right time. Measuring methods are given at the end.
Bear in mind that some of these methods need to be learned and practised on pieces of scrap wood before carrying out a delicate operation on your block.
Further explanations on block adjustment can be found here
1. Roughing down the top of the block
1.1 Your block should still be too high. Use the broaching or shaping tool (or abrasive paper on a flat surface or a large file). Rub the top of the block to and fro on this lengthways, making sure that the whole length is in contact to avoid making the surface convex (fig. 1.1.1). You may find that the tool works better in one direction than the other because of the grain. If your block is to be arched rock it gently from one side to the other between cuts, trying not to make facets but a progressive curve (photo). If you do get any facets you can remove them later, but before reaching the final height or your block could become too low in the process (see § 3.3.1, 3.3.)
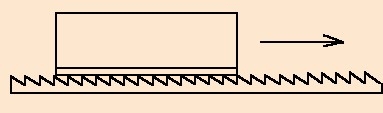 fig. 1.1.1 |

|
Pause often to measure your work and to check your progress, by replacing the block in the recorder. Work very slowly so as not to go too far. As soon as you can see the edge of the labium you are close to your goal, so you must slow down then.
1 .2 As has been said before, you can replace the shaping tool with a piece of fairly coarse grained abrasive paper (240) on a flat surface, and using a finer grain to finish (320).
You can also combine the two methods, starting with the tool and continuing with the abrasive paper when you are close to the level of the labium.
1 .3 Be careful not to make your block convex at this stage by pressing harder at the ends than in the middle. Check this all the time. If it happens, you can correct it with a scraper, or by scraping with a knife held about at right angles to the wood. Here is a simple way to avoid the problem: use technique n° 1.2 using bands of abrasive paper that are narrower that the length of the block and held widthways. The middle of the block will always be in contact with the paper longer than the ends, so more material will be removed here.
If you blow into your instrument now it should now have progressed in volume.
2. Cutting the beak
2.1 2.1 Once the beak has been cut you will no longer be able to measure the height at the windway entrance. When you have got the right height and slope you can cut the beak shape to make it easier to play the recorder.
2.2 Put the block into its position and use a coping saw to cut the block almost level with the beak surface, taking care not to mark the wood of the recorder itself. The head joint must be firmly held in a vice for this. Put a piece of leather around the wood or against the jaws to avoid marking it. Be careful also not to break the end of the block while starting the cut. Work from the sides to the middle until the saw is well into the wood.
|
2.3 Next you can level off the rear surface of the block and remove all the saw marks with a chisel held with the bevel against the wood.
2.4 If you make any facets, they can be removed with a round or oval file, and you can smooth the wood with a scraper and abrasive paper. |

|
3. Finishing techniques for the top of the block
3.1 To remove high spots (convexity) and make the block concave.
3.1.1 The scraper is an efficient tool for this, since it has a natural tendency to dig into soft wood and make hollows. You can't use it on the ends of the block, since it needs 1 or 2 mm to start biting. The scraper should be held with both hands, whilst the wood is fixed in the vice.
3.1 .2 You can also use a small flat file. Needle files are good for this. Choose a fairly coarse one. Hold the file with both hands to get better control, and use the vice for holding the block.
3.1.3 You can also use a sharp knife as a scraper (a model maker's knife works well). Scrape the wood with the blade held almost perpendicular to the surface. You can hold the block in one hand and work with the other for this or use the vice.
3.2 3.2 To remove excess wood on the whole length of the block
3.2.1 Rub the top of the block lengthwise on the shaping tool or, better, a narrow strip of abrasive paper on a flat surface. Being smaller than the length of the block, it will remove more wood in the middle than on the ends, keeping the surface concave (see photo below).
Be sure to work only on the part that is too high.
3.3 To remove facets left by the shaping tool on an arched block
3.3.1 You can use the same method as for removing high spots, i.e. a scraper (§ 3.1.1), a small flat file (§ 3.1.2), scraping with a knife blade (§ 3.1.3) working on the whole length of the highest part of the facets at a time (see fig. 3.3.1 & photos).
 working with a scraper |
 working with a file |
 working with a strip of abrasive paper |
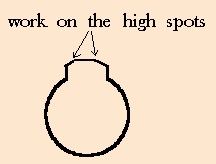 fig. 3.3.1 |
4. Cutting the chamfer
| The chamfer is one of the most important features of the block. It has a considerable influence on the sound of the instrument by working on the turbulence at the windway exit. It has to have the same angle (about 45°) and thickness (0.5 to 1 mm) all way. It must be well defined with neat angles. Here are two different techniques for doing this : |

|
Using a sharp chisel:
Fix the block at an angle in the vice as in fig.4.2.1. Hold the chisel at 45° to the block as in fig.4.2.2. and make a series of cuts which will leave a very smooth surface.
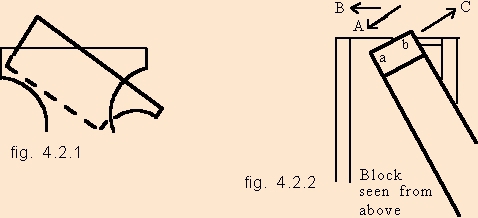
| The chisel must move in the two directions shown by the arrows A and B. Begin at the corner of the bevel a and slowly go towards the corner b. You will have used all the width of the blade and progressed a certain distance along the chamfer, cutting off a very clean shaving. Slide the blade back in the direction shown by the arrow C without leaving the wood and without going back along the chamfer. You will now be able to start an identical cut to go further. You will have to do several before getting to the end of the chamfer. The result should be a clean smooth cut. One of the most difficult things is taking away just the right amount of wood to start with. Take care also not to break off any wood at the end, so the last cut must be very carefully done. This technique needs to be learned and practised, before any attempt is made to cut the chamfer on the block itself. |

|
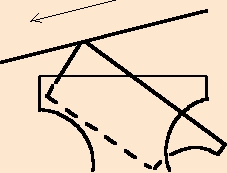
4.3 Using a file
This is easier, but the result is often less clean. Fix the wood at an angle in the vice as in fig. 4.3. A flat needle file is the right tool for this job.

|
Move the file downward across the chamfer, starting on one side of the block and
slowly progressing towards the other. Don't change the angle of the file during the process.
Try to make identical movements so that the chamfer is regular. The chamfer itself is not
always easy to see. To be sure to control the file, hold above and below the chamfer. Work in
the direction shown in fig. 4.3 so that its upper edge is clean.
Practice on a piece of scrap wood before doing this on the block itself.
|
4.4 Replace the block. The instrument should now have a stronger sound. You will have to experiment to find the best angle and width.
5. Polishing the block
5.1 Your block will give the best results if it is nice and smooth
5.2 The simplest way is to use small strips of wood with fine grain abrasive paper (400, 500, 600) glued to them. You can prepare a piece in advance and cut the strips as you need them. If you can find it, you can use some horsetail or scrape grass to finish the polishing. The stem of this plant contains fin crystals of silicium that are abrasive.
6. Les moyens de mesure & de contrôle
6.1 Use callipers to check the height of your block.
6.2 To estimate its slope, measure its height at both ands and compare the results. If your block is conical you will have to take this into account. Once the beak has been cut you cannot measure the height directly at the windway entrance. You must then take measurement half way down and double the difference.
6.3 To check the concavity of your block surface place a steel ruler (or the side of your callipers along the top and look against a light source. The ruler should only touch the wood at both ends. You will also be able to see if the hollow is regular.
6.4 You can also use a wooden ruler whose edge has been marked with a pencil to colour it, then rub the block surface with this. The high spots will be made visible by the pencil markings. Keep the ruler straight in the middle, and parallel to the edges on the sides. Only the ends will be marked when the concavity is correct.
6.5 To check the arch of the block (if the labium is arched), mark a circle of the correct radius on p piece of thin card, and cut it out very precisely. This will give you a gauge that you can apply across the top looking towards a source of light. Any defects will be visible.
6.6 To check that the block surface is parallel to the windway put it into its position in the recorder and look through the windway towards a source of light. The amount of light visible under the labium will give you this information. The height must be the same on both sides.
7. If the block does not fit perfectly
7.1 If some light is visible between the block and the instrument, don't worry. You can fill these gaps with wax. Just warm a small piece of beeswax and melt it into the places where it does not fit. Then scrape away the surplus.
8. Protection against condensation
Condensation formed in the windway will flow down the front of the block and penetrate through the end grain, which could make it swell. To limit this apply a layer of shellac or copal varnish on the end when the block is dry. No varnish should be put on the top surface, which must remain absorbant, or on the chamfer.

For those unfamiliar with tools and how to sharpen and use them, there are many books on the subject that they could profitably read before making their first block.
Making a block is a very interesting experience. Not only does it enable a player to improve some instruments, but it also gives considerable insight as to how a recorder works.